Installing AJAX Control Toolkit 4 in Visual Studio 2010
Posted
by Yousef_Jadallah
on ASP.net Weblogs
See other posts from ASP.net Weblogs
or by Yousef_Jadallah
Published on Fri, 16 Apr 2010 06:45:00 GMT
Indexed on
2010/04/16
6:53 UTC
Read the original article
Hit count: 2436
In this tutorial I’ll show you how to install AJAX Control toolkit step by step:
You can download AJAX Toolkit .NET 4 “Apr 12 2010” released before 4 days, from http://ajaxcontroltoolkit.codeplex.com/releases/view/43475#DownloadId=116534, Once downloaded, extract AjaxControlToolkit.Binary.NET4 on your computer, then extract AjaxControlToolkitSampleSite.
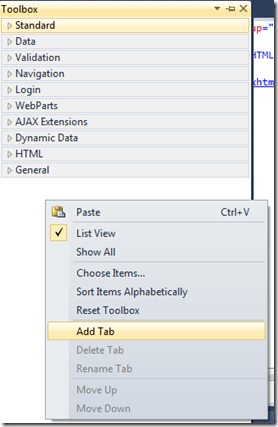
after that you need to open Visual Studio 2010, So we will add the toolkit to the toolbox. To do that press right-click in an empty space on your toolbox, then choose Add Tab.
You can rename the new tab to be “Ajax Toolkit” for example :
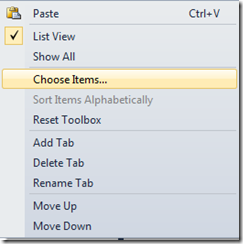
Then when it is added, right-click under the tab and select Choose Items:
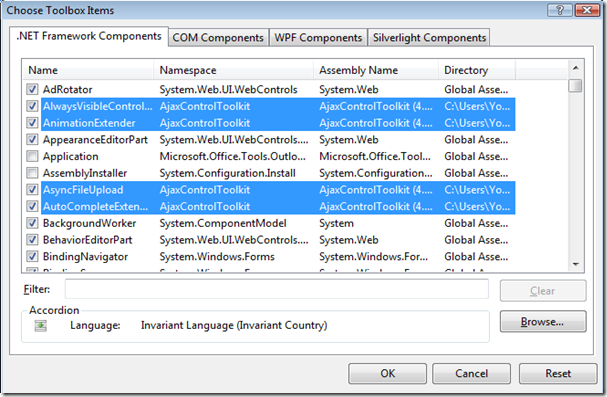
When the dialog box appears Choose .NET Framework Components tab then click Browse button and find AjaxControlToolkit folder that you installed the AJAX Control Toolkit. In that directory you will find a sub-directory called AjaxControlToolkitSampleSite, and under that folder you will find bin Folder, in this folder choose AjaxControlToolkit.DLL which 5.59 MB.
The result of these steps, Visual Studio will load all the controls from the DLL file and by default it will be checked in this list:
To submit your steps press OK button.
Ultimately,you can find the components in your Toolbox and you can use it.
Happy programming!
© ASP.net Weblogs or respective owner


