Using Unity – Part 2
Posted
by nmarun
on ASP.net Weblogs
See other posts from ASP.net Weblogs
or by nmarun
Published on Thu, 22 Apr 2010 03:26:23 GMT
Indexed on
2010/04/22
3:33 UTC
Read the original article
Hit count: 878
In the first part of this series, we created a simple project and learned how to implement IoC pattern using Unity. In this one, I’ll show how you can instantiate other types that implement our IProduct interface. One place where this one would want to use this feature is to create mock types for testing purposes.
Alright, let’s dig in. I added another class – Product2.cs to the ProductModel project.
1: public class Product2 : IProduct
2: {
3: public string Name { get; set;}
4: public Category Category { get; set; }
5: public DateTime MfgDate { get;set; }
6:
7: public Product2()
8: {
9: Name = "Canon Digital Rebel XTi";
10: Category = new Category {Name = "Electronics", SubCategoryName = "Digital Cameras"};
11: MfgDate = DateTime.Now;
12: }
13:
14: public string WriteProductDetails()
15: {
16: return string.Format("Name: {0}<br/>Category: {1}<br/>Mfg Date: {2}",
17: Name, Category, MfgDate.ToShortDateString());
18: }
19: }
Highlights of this class are that it implements IProduct interface and it has some different properties than the Product class. The Category class looks like below:
1: public class Category
2: {
3: public string Name { get; set; }
4: public string SubCategoryName { get; set; }
5:
6: public override string ToString()
7: {
8: return string.Format("{0} - {1}", Name, SubCategoryName);
9: }
10: }
We’ll go to our web.config file to add the configuration information about this new class – Product2 that we created. Let’s first add a typeAlias element.
1: <typeAlias alias="Product2" type="ProductModel.Product2, ProductModel"/>
That’s all that is needed for us to get an instance of Product2 in our application. I have a new button added to the .aspx page and the click event of this button is where all the magic happens:
1: private IUnityContainer unityContainer;
2: protected void Page_Load(object sender, EventArgs e)
3: {
4: unityContainer = Application["UnityContainer"] as IUnityContainer;
5:
6: if (unityContainer == null)
7: {
8: productDetailsLabel.Text = "ERROR: Unity Container not populated in Global.asax.<p />";
9: }
10: else
11: {
12: if (!IsPostBack)
13: {
14: IProduct productInstance = unityContainer.Resolve<IProduct>();
15: productDetailsLabel.Text = productInstance.WriteProductDetails();
16: }
17: }
18: }
19:
20: protected void Product2Button_Click(object sender, EventArgs e)
21: {
22: unityContainer.RegisterType<IProduct, Product2>();
23: IProduct product2Instance = unityContainer.Resolve<IProduct>();
24: productDetailsLabel.Text = product2Instance.WriteProductDetails();
25: }
The unityContainer instance is set in the Page_Load event. Line 22 in the click event of the Product2Button registers a type mapping in the container. In English, this means that when unityContainer tries to resolve for IProduct, it gets an instance of Product2.
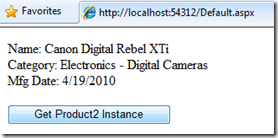
Once this code runs, following output is rendered:
There’s another way of doing this. You can resolve an instance of the requested type with a name from the container. We’ll have to update the container element of our web.config file to include the following:
1: <container name="unityContainer">
2: <types>
3: <type type="IProduct" mapTo="Product"/>
4: <!-- Named mapping for IProduct to Product -->
5: <type type="IProduct" mapTo="Product" name="LegacyProduct" />
6: <!-- Named mapping for IProduct to Product2 -->
7: <type type="IProduct" mapTo="Product2" name="NewProduct" />
8: </types>
9: </container>
I’ve added a Dropdownlist and a button to the design page:
1: <asp:DropDownList ID="ModelTypesList" runat="server">
2: <asp:ListItem Text="Legacy Product" Value="LegacyProduct" />
3: <asp:ListItem Text="New Product" Value="NewProduct" />
4: </asp:DropDownList>
5: <br />
6: <asp:Button ID="SelectedModelButton" Text="Get Selected Instance" runat="server"
7: onclick="SelectedModelButton_Click" />
1: protected void SelectedModelButton_Click(object sender, EventArgs e)
2: {
3: // get the selected value: LegacyProduct or NewProduct
4: string modelType = ModelTypesList.SelectedValue;
5: // pass the modelType to the Resolve method
6: IProduct customModel = unityContainer.Resolve<IProduct>(modelType);
7: productDetailsLabel.Text = customModel.WriteProductDetails();
8: }
Pretty straight forward right? The only thing to note here is that the values in the dropdownlist item need to match the name attribute of the type. Depending on what you select, you’ll get an instance of either the Product class or the Product2 class and the corresponding WriteProductDetails() method is called.
Now you see, how either of these methods can be used to create mock objects your the test project. See the code here.
I’ll continue to share more of Unity in the next blog.
© ASP.net Weblogs or respective owner
