Update Metadata and Cover Art in Windows Media Player 12
Posted
by DigitalGeekery
on How to geek
See other posts from How to geek
or by DigitalGeekery
Published on Tue, 27 Apr 2010 09:00:00 +0000
Indexed on
2010/04/27
9:13 UTC
Read the original article
Hit count: 926
If you use Windows Media Player 12 in Windows 7, you may notice some of your media is missing information when displayed in the library. Today we look at how to edit and update metadata and cover art in WMP 12.
By default, Windows Media Player will pull metadata, such as the title, artist, album, and cover art from the Internet. If you did not accept that default option during setup, we’ll need to turn the feature on first.

Select Tools > Options from the top Menu bar.

On the Library tab, ensure that Retrieve additional information form the Internet is checked. Click OK.

Editing Metadata
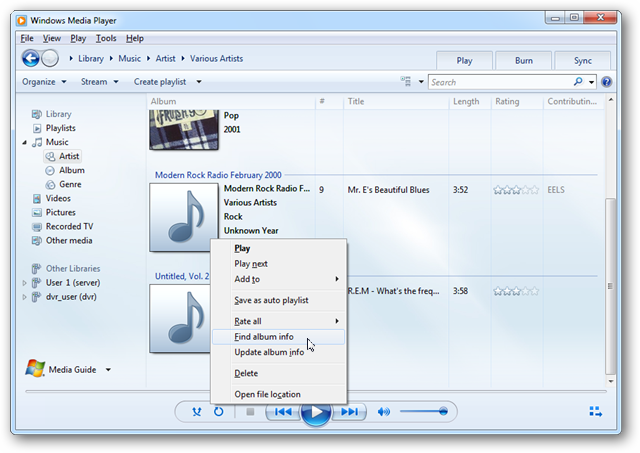
Now we’re ready to update some files. Find a media file with incorrect details or cover art. Right-click on the title and select Find album info.

This will bring up the Find album information window. Here you’ll see the existing information that Windows Media Player interpreted as correct on the left side. The results of WMP’s search for the media information are on the right.
Click on Artists, Albums , or Tracks to scroll through the search results and try to find a match. You can also type in new keywords in the Search box and hit enter (or click the Search button) to perform a new search.

If you find a correct match for your media file, click to select it and click Next.

You’ll be prompted to confirm your selection, then click Finish.

You should now see your media file displayed properly in Windows Media Player.

Manually Entering Metadata
If your search for the correct media information comes up empty, you can always manually enter the information yourself.
On the Find album information window, click Edit under Existing Information.

You can edit the existing information in the text boxes or the Genre dropdown box.

There are a couple hidden text boxes below. Click next to Contributing Artist or Composer to enter that information.

Choosing Your Own Cover Art
If your media file doesn’t pull the proper cover art, or if you simply wish to find a different image, you can add your own. Search online for a suitable image. An ideal size would be around 300 x 300 pixels, give or take. Right-click on the image copy the image.

You’ll need to switch to Expanded title (if you haven’t already) to paste the image.

Paste your new image by right-clicking on the current image and select Paste album art. Note: If the image is not suitable size or type, the Paste album art option will not be available.

Your new cover art will appear in Windows Media Player.

Even though it is pulled from the Internet, cover art is cached on your computer and will still be available when you are disconnected from the Internet.
Are you new to Windows Media Player? If so, check out our article on how to Manage your music with Windows Media Player.
| Similar Articles | Productive Geek Tips |
| Latest Software Reviews | Tinyhacker Random Tips |
© How to geek or respective owner
