How to configure Visual Studio 2010 code coverage for ASP.NET MVC unit tests
Posted
by DigiMortal
on ASP.net Weblogs
See other posts from ASP.net Weblogs
or by DigiMortal
Published on Mon, 03 May 2010 23:08:39 GMT
Indexed on
2010/05/03
23:19 UTC
Read the original article
Hit count: 902
I just got Visual Studio 2010 code coverage work with ASP.NET MVC application unit tests. Everything is simple after you have spent some time with forums, blogs and Google. To save your valuable time I wrote this posting to guide you through the process of making code coverage work with ASP.NET MVC application unit tests.
After some fighting with Visual Studio I got everything to work as expected. I am still not very sure why users must deal with this mess, but okay – I survived it. Before you start configuring Visual Studio I expect your solution meets the following needs:
- there are at least one library that will be tested,
- there is at least on library that contains tests to be run,
- there are some classes and some tests for them,
- and, of course, you are using version of Visual Studio 2010 that supports tests (I have Visual Studio 2010 Ultimate).
Now open the following screenshot to separate windows and follow the steps given below.

Visual Studio 2010 Test Settings window.
Click on image to see it at original size.
- Double click on Local.testsettings under Solution Items. Test settings window will be opened.
- Select “Data and Diagnostics” from left pane.
- Mark checkboxes “ASP.NET Profiler” and “Code Coverage”.
- Move cursor to “Code Coverage” line and press Configure button or make double click on line. Assemblies selection window will be opened.
- Mark checkboxes that are located before assemblies about what you want code coverage reports and apply settings.
- Save your project and close Visual Studio.
- Run Visual Studio as Administrator and run tests. NB! Select Test => Run => Tests in Current Context from menu.
- When tests are run you can open code coverage results by selecting Test => Windows => Code Coverage Results from menu.
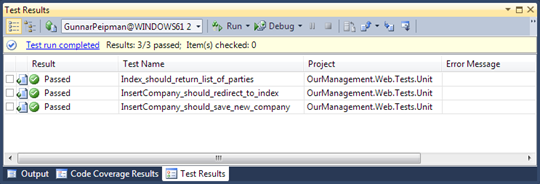
Here you can see my example test results.

Visual Studio 2010 Test Results window. All my tests passed this time. :)
Click on image to see it at original size.
And here are the code coverage results.

Visual Studio 2101 Code Coverage Results. I need a lot more tests for sure.
Click on image to see it at original size.
As you can see everything was pretty simple. But it took me sometime to figure out how to get everything work as expected.
Problems?
You may face some problems when making code coverage work. Here is my short list of possible problems.
- Make sure you have all assemblies available for code coverage. In some cases it needs more libraries to be referenced as you currently have. By example, I had to add some more Enterprise Library assemblies to my project. You can use EventViewer to discover errors that where given during testing.
- Make sure you selected all testable assemblies from Code Coverage settings like shown above. Otherwise you may get empty results.
- Tests with code coverage are slower because we need ASP.NET profiler. If your machine slows down then try to free more resources.
© ASP.net Weblogs or respective owner