Entity Framework Code-First, OData & Windows Phone Client
Posted
by Jon Galloway
on ASP.net Weblogs
See other posts from ASP.net Weblogs
or by Jon Galloway
Published on Thu, 06 Jan 2011 17:56:07 GMT
Indexed on
2011/01/06
18:54 UTC
Read the original article
Hit count: 1105
Entity Framework Code-First is the coolest thing since sliced bread, Windows Phone is the hottest thing since Tickle-Me-Elmo and OData is just too great to ignore.
As part of the Full Stack project, we wanted to put them together, which turns out to be pretty easy… once you know how.
EF Code-First CTP5 is available now and there should be very few breaking changes in the release edition, which is due early in 2011.
| Note: EF Code-First evolved rapidly and many of the existing documents and blog posts which were written with earlier versions, may now be obsolete or at least misleading. |
Code-First?
With traditional Entity Framework you start with a database and from that you generate “entities” – classes that bridge between the relational database and your object oriented program.

With Code-First (Magic-Unicorn) (see Hanselman’s write up and this later write up by Scott Guthrie) the Entity Framework looks at classes you created and says “if I had created these classes, the database would have to have looked like this…” and creates the database for you! By deriving your entity collections from DbSet and exposing them via a class that derives from DbContext, you "turn on" database backing for your POCO with a minimum of code and no hidden designer or configuration files.
| POCO == Plain Old CLR Objects |
Your entity objects can be used throughout your applications - in web applications, console applications, Silverlight and Windows Phone applications, etc. In our case, we'll want to read and update data from a Windows Phone client application, so we'll expose the entities through a DataService and hook the Windows Phone client application to that data via proxies. Piece of Pie. Easy as cake.
The Demo Architecture
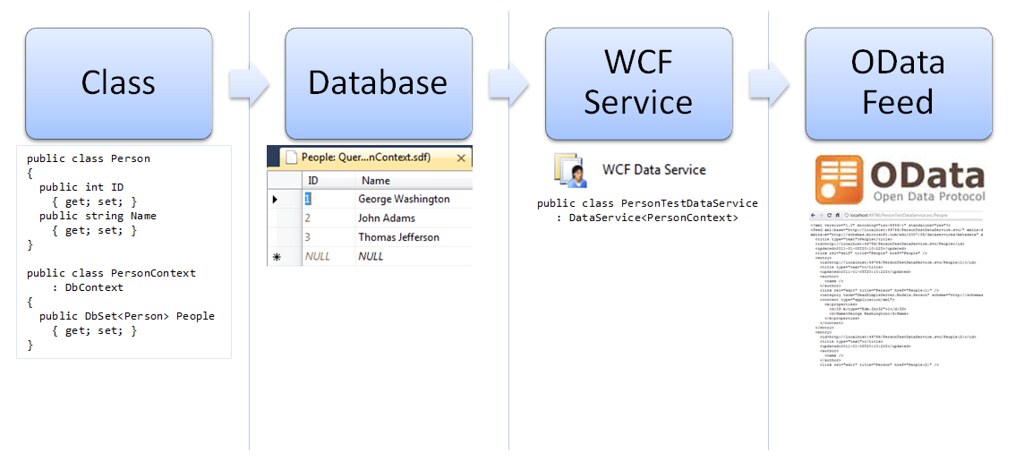
To see this at work, we’ll create an ASP.NET/MVC application which will act as the host for our Data Service. We’ll create an incredibly simple data layer using EF Code-First on top of SQLCE4 and we’ll expose the data in a WCF Data Service using the oData protocol. Our Windows Phone 7 client will instantiate the data context via a URI and load the data asynchronously.
Setting up the Server project with MVC 3, EF Code First, and SQL CE 4
Create a new application of type ASP.NET MVC 3 and name it DeadSimpleServer.
We need to add the latest SQLCE4 and Entity Framework Code First CTP's to our project. Fortunately, NuGet makes that really easy. Open the Package Manager Console (View / Other Windows / Package Manager Console) and type in "Install-Package EFCodeFirst.SqlServerCompact" at the PM> command prompt. Since NuGet handles dependencies for you, you'll see that it installs everything you need to use Entity Framework Code First in your project.
PM> install-package EFCodeFirst.SqlServerCompact
'SQLCE (= 4.0.8435.1)' not installed. Attempting to retrieve dependency from source...
Done
'EFCodeFirst (= 0.8)' not installed. Attempting to retrieve dependency from source...
Done
'WebActivator (= 1.0.0.0)' not installed. Attempting to retrieve dependency from source...
Done
You are downloading SQLCE from Microsoft, the license agreement to which is available at http://173.203.67.148/licenses/SQLCE/EULA_ENU.rtf. Check the package for additional dependencies, which may come with their own license agreement(s). Your use of the package and dependencies constitutes your acceptance of their license agreements. If you do not accept the license agreement(s), then delete the relevant components from your device.
Successfully installed 'SQLCE 4.0.8435.1'
You are downloading EFCodeFirst from Microsoft, the license agreement to which is available at http://go.microsoft.com/fwlink/?LinkID=206497. Check the package for additional dependencies, which may come with their own license agreement(s). Your use of the package and dependencies constitutes your acceptance of their license agreements. If you do not accept the license agreement(s), then delete the relevant components from your device.
Successfully installed 'EFCodeFirst 0.8'
Successfully installed 'WebActivator 1.0.0.0'
You are downloading EFCodeFirst.SqlServerCompact from Microsoft, the license agreement to which is available at http://173.203.67.148/licenses/SQLCE/EULA_ENU.rtf. Check the package for additional dependencies, which may come with their own license agreement(s). Your use of the package and dependencies constitutes your acceptance of their license agreements. If you do not accept the license agreement(s), then delete the relevant components from your device.
Successfully installed 'EFCodeFirst.SqlServerCompact 0.8'
Successfully added 'SQLCE 4.0.8435.1' to EfCodeFirst-CTP5
Successfully added 'EFCodeFirst 0.8' to EfCodeFirst-CTP5
Successfully added 'WebActivator 1.0.0.0' to EfCodeFirst-CTP5
Successfully added 'EFCodeFirst.SqlServerCompact 0.8' to EfCodeFirst-CTP5
Note: We're using SQLCE 4 with Entity Framework here because they work really well together from a development scenario, but you can of course use Entity Framework Code First with other databases supported by Entity framework.
Creating The Model using EF Code First
Now we can create our model class. Right-click the Models folder and select Add/Class. Name the Class Person.cs and add the following code:
using System.Data.Entity;

namespace DeadSimpleServer.Models
{
   public class Person
   {
      public int ID { get; set; }
      public string Name { get; set; }
   }

   public class PersonContext : DbContext
   {
      public DbSet<Person> People { get; set; }
   }
}
Notice that the entity class Person has no special interfaces or base class. There's nothing special needed to make it work - it's just a POCO. The context we'll use to access the entities in the application is called PersonContext, but you could name it anything you wanted. The important thing is that it inherits DbContext and contains one or more DbSet which holds our entity collections.
Adding Seed Data
We need some testing data to expose from our service. The simplest way to get that into our database is to modify the CreateCeDatabaseIfNotExists class in AppStart_SQLCEEntityFramework.cs by adding some seed data to the Seed method:
protected virtual void Seed( TContext context )
{
   var personContext = context as PersonContext;
   personContext.People.Add( new Person { ID = 1, Name = "George Washington" } );
   personContext.People.Add( new Person { ID = 2, Name = "John Adams" } );
   personContext.People.Add( new Person { ID = 3, Name = "Thomas Jefferson" } );
   personContext.SaveChanges();
}
The CreateCeDatabaseIfNotExists class name is pretty self-explanatory - when our DbContext is accessed and the database isn't found, a new one will be created and populated with the data in the Seed method. There's one more step to make that work - we need to uncomment a line in the Start method at the top of of the AppStart_SQLCEEntityFramework class and set the context name, as shown here,
public static class AppStart_SQLCEEntityFramework {
    public static void Start() {
        DbDatabase.DefaultConnectionFactory = new SqlCeConnectionFactory("System.Data.SqlServerCe.4.0");

        // Sets the default database initialization code for working with Sql Server Compact databases
        // Uncomment this line and replace CONTEXT_NAME with the name of your DbContext if you are
        // using your DbContext to create and manage your database
        DbDatabase.SetInitializer(new CreateCeDatabaseIfNotExists<PersonContext>());
    }
}
Now our database and entity framework are set up, so we can expose data via WCF Data Services.
Note: This is a bare-bones implementation with no administration screens. If you'd like to see how those are added, check out The Full Stack screencast series.
Creating the oData Service using WCF Data Services
Add a new WCF Data Service to the project (right-click the project / Add New Item / Web / WCF Data Service).
| We’ll be exposing all the data as read/write. Remember to reconfigure to control and minimize access as appropriate for your own application. |
Open the code behind for your service. In our case, the service was called PersonTestDataService.svc so the code behind class file is PersonTestDataService.svc.cs.
using System.Data.Services;
using System.Data.Services.Common;
using System.ServiceModel;
using DeadSimpleServer.Models;

namespace DeadSimpleServer
{
   [ServiceBehavior( IncludeExceptionDetailInFaults = true )]
   public class PersonTestDataService : DataService<PersonContext>
   {
      // This method is called only once to initialize service-wide policies.
      public static void InitializeService( DataServiceConfiguration config )
      {
         config.SetEntitySetAccessRule( "*", EntitySetRights.All );
         config.DataServiceBehavior.MaxProtocolVersion = DataServiceProtocolVersion.V2;
         config.UseVerboseErrors = true;
      }
   }
}
We're enabling a few additional settings to make it easier to debug if you run into trouble. The ServiceBehavior attribute is set to include exception details in faults, and we're using verbose errors. You can remove both of these when your service is working, as your public production service shouldn't be revealing exception information.
You can view the output of the service by running the application and browsing to http://localhost:[portnumber]/PersonTestDataService.svc/:
<service xml:base="http://localhost:49786/PersonTestDataService.svc/" xmlns:atom="http://www.w3.org/2005/Atom" xmlns:app="http://www.w3.org/2007/app" xmlns="http://www.w3.org/2007/app">
 <workspace>
  <atom:title>Default</atom:title>
   <collection href="People">
    <atom:title>People</atom:title>
   </collection>
  </workspace>
</service>
This indicates that the service exposes one collection, which is accessible by browsing to http://localhost:[portnumber]/PersonTestDataService.svc/People
<?xml version="1.0" encoding="iso-8859-1" standalone="yes"?>
<feed xml:base=http://localhost:49786/PersonTestDataService.svc/
xmlns:d="http://schemas.microsoft.com/ado/2007/08/dataservices"
xmlns:m="http://schemas.microsoft.com/ado/2007/08/dataservices/metadata"
xmlns="http://www.w3.org/2005/Atom">
  <title type="text">People</title>
  <id>http://localhost:49786/PersonTestDataService.svc/People</id>
  <updated>2010-12-29T01:01:50Z</updated>
  <link rel="self" title="People" href="People" />
  <entry>
    <id>http://localhost:49786/PersonTestDataService.svc/People(1)</id>
    <title type="text"></title>
    <updated>2010-12-29T01:01:50Z</updated>
    <author>
      <name />
    </author>
    <link rel="edit" title="Person" href="People(1)" />
    <category term="DeadSimpleServer.Models.Person"
      scheme="http://schemas.microsoft.com/ado/2007/08/dataservices/scheme" />
    <content type="application/xml">
      <m:properties>
        <d:ID m:type="Edm.Int32">1</d:ID>
        <d:Name>George Washington</d:Name>
      </m:properties>
    </content>
  </entry>
  <entry>
    ...
  </entry>
</feed>
Let's recap what we've done so far.
But enough with services and XML - let's get this into our Windows Phone client application.
Creating the DataServiceContext for the Client
Use the latest DataSvcUtil.exe from http://odata.codeplex.com. As of today, that's in this download: http://odata.codeplex.com/releases/view/54698
You need to run it with a few options:
/uri - This will point to the service URI. In this case, it's http://localhost:59342/PersonTestDataService.svc Pick up the port number from your running server (e.g., the server formerly known as Cassini).
/out - This is the DataServiceContext class that will be generated. You can name it whatever you'd like.
/Version - should be set to 2.0
/DataServiceCollection - Include this flag to generate collections derived from the DataServiceCollection base, which brings in all the ObservableCollection goodness that handles your INotifyPropertyChanged events for you.
Here's the console session from when we ran it:
<ListBox
   x:Name="MainListBox"
   Margin="0,0,-12,0"
   ItemsSource="{Binding}"
   SelectionChanged="MainListBox_SelectionChanged">
Next, to keep things simple, change the Binding on the two TextBlocks within the DataTemplate to Name and ID,
 <ListBox
    x:Name="MainListBox"
    Margin="0,0,-12,0"
    ItemsSource="{Binding}"
    SelectionChanged="MainListBox_SelectionChanged">
    <ListBox.ItemTemplate>
       <DataTemplate>
          <StackPanel
             Margin="0,0,0,17"
             Width="432">
             <TextBlock
                Text="{Binding Name}"
                TextWrapping="Wrap"
                Style="{StaticResource PhoneTextExtraLargeStyle}" />
             <TextBlock
                Text="{Binding ID}"
                TextWrapping="Wrap"
                Margin="12,-6,12,0"
                Style="{StaticResource PhoneTextSubtleStyle}" />
          </StackPanel>
       </DataTemplate>
    </ListBox.ItemTemplate>
 </ListBox>
Getting The Context
In the code-behind you’ll first declare a member variable to hold the context from the Entity Framework. This is named using convention over configuration.
The db type is Person and the context is of type PersonContext, You initialize it by providing the URI, in this case using the URL obtained from the Cassini web server,
PersonContext context =
  new PersonContext(
  new Uri( "http://localhost:49786/PersonTestDataService.svc/" ) );
Create a second member variable of type DataServiceCollection<Person> but do not initialize it,
DataServiceCollection<Person> people;
In the constructor you’ll initialize the DataServiceCollection using the PersonContext,
public MainPage()
{
   InitializeComponent();
   people = new DataServiceCollection<Person>( context );
Finally, you’ll load the people collection using the LoadAsync method, passing in the fully specified URI for the People collection in the web service,
 people.LoadAsync(
    new Uri(
    "http://localhost:49786/PersonTestDataService.svc/People" ) );
Note that this method runs asynchronously and when it is finished the people collection is already populated. Thus, since we didn’t need or want to override any of the behavior we don’t implement the LoadCompleted.
You can use the LoadCompleted event if you need to do any other UI updates, but you don't need to. The final code is as shown below:
using System;
using System.Data.Services.Client;
using System.Windows;
using System.Windows.Controls;
using DeadSimpleServer.Models;
using Microsoft.Phone.Controls;

namespace WindowsPhoneODataTest
{
   public partial class MainPage : PhoneApplicationPage
   {
      PersonContext context = new PersonContext(
        new Uri( "http://localhost:49786/PersonTestDataService.svc/" ) );
      DataServiceCollection<Person> people;

      // Constructor
      public MainPage()
      {
         InitializeComponent();

         // Set the data context of the listbox control to the sample data
         // DataContext = App.ViewModel;
         people = new DataServiceCollection<Person>( context );
         people.LoadAsync(
            new Uri( "http://localhost:49786/PersonTestDataService.svc/People" ) );
         DataContext = people;
         this.Loaded += new RoutedEventHandler( MainPage_Loaded );
      }

      // Handle selection changed on ListBox
      private void MainListBox_SelectionChanged( object sender, SelectionChangedEventArgs e )
      {
         // If selected index is -1 (no selection) do nothing
         if ( MainListBox.SelectedIndex == -1 )
            return;

         // Navigate to the new page
         NavigationService.Navigate(
            new Uri( "/DetailsPage.xaml?selectedItem="
            + MainListBox.SelectedIndex, UriKind.Relative ) );

         // Reset selected index to -1 (no selection)
         MainListBox.SelectedIndex = -1;
      }

      // Load data for the ViewModel Items
      private void MainPage_Loaded( object sender, RoutedEventArgs e )
      {
         if ( !App.ViewModel.IsDataLoaded )
         {
            App.ViewModel.LoadData();
         }
      }
   }
}
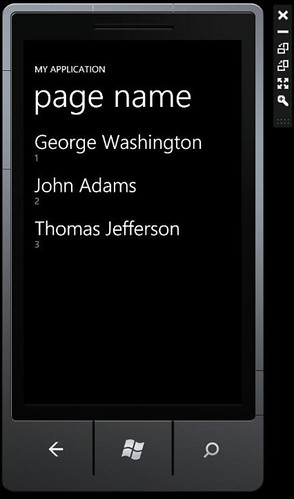
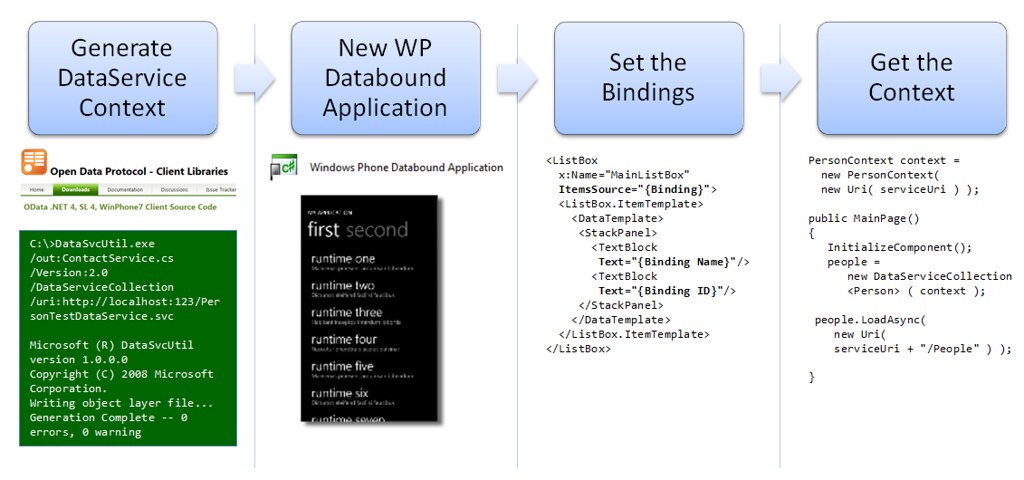
With people populated we can set it as the DataContext and run the application; you’ll find that the Name and ID are displayed in the list on the Mainpage. Here's how the pieces in the client fit together:
Complete source code available here
© ASP.net Weblogs or respective owner


