Configure Forms based authentication in SharePoint 2010
Posted
by sreejukg
on ASP.net Weblogs
See other posts from ASP.net Weblogs
or by sreejukg
Published on Sun, 19 Jun 2011 06:58:00 GMT
Indexed on
2011/06/20
16:24 UTC
Read the original article
Hit count: 1086
Configuring form authentication is a straight forward task in SharePoint. Mostly public facing websites built on SharePoint requires form based authentication. Recently, one of the WCM implementation where I was included in the project team required registration system. Any internet user can register to the site and the site offering them some membership specific functionalities once the user logged in. Since the registration open for all, I don’t want to store all those users in Active Directory. I have decided to use Forms based authentication for those users. This is a typical scenario of form authentication in SharePoint implementation.
To implement form authentication you require the following
- A data store where you are storing the users – technically this can be active directory, SQL server database, LDAP etc. Form authentication will redirect the user to the login page, if the request is not authenticated. In the login page, there will be controls that validate the user inputs against the configured data store. In this article, I am going to use SQL server database with ASP.Net membership API’s to configure form based authentication in SharePoint 2010.
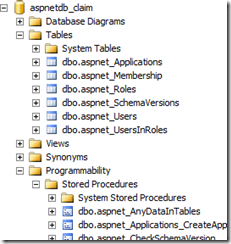
This article assumes that you have SQL membership database available. I already configured the membership and roles database using aspnet_regsql command. If you want to know how to configure membership database using aspnet_regsql command, read the below blog post. http://weblogs.asp.net/sreejukg/archive/2011/06/16/usage-of-aspnet-regsql-exe-in-asp-net-4.aspxThe snapshot of the database after implementing membership and role manager is as follows. I have used the database name “aspnetdb_claim”.
Make sure you have created the database and make sure your database contains tables and stored procedures for membership.
- Create a web application with claims based authentication.
This article assumes you already created a web application using claims based authentication. If you want to enable forms based authentication in SharePoint 2010, you must enable claims based authentication. Read this post for creating a web application using claims based authentication.
http://weblogs.asp.net/sreejukg/archive/2011/06/15/create-a-web-application-in-sharepoint-2010-using-claims-based-authentication.aspx
You make sure, you have selected enable form authentication, and then selected Membership provider and Role manager name. To make sure you are done with the configuration, navigate to central administration website, from central administration, navigate to the Web Applications page, select the web application and click on icon, you will see the authentication providers for the current web application. Go to the section Claims authentication types, and make sure you have enabled forms based authentication.
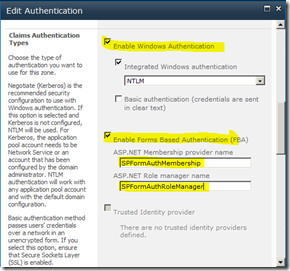
As mentioned in the snapshot, I have named the membership provider as SPFormAuthMembership and role manager as SPFormAuthRoleManager. You can choose your own names as you need. - Modify the configuration files(Web.Config) to enable form authentication
There are three applications that needs to be configured to support form authentication. The following are those applications. - Central Administration
If you want to assign permissions to web application using the credentials from form authentication, you need to update Central Administration configuration. If you do not want to access form authentication credentials from Central Administration, just leave this step. - STS service application
Security Token service is the service application that issues security token when users are logging in. You need to modify the configuration of STS application to make sure users are able to login. To find the STS application, follow the following steps - Go to the IIS Manager
- Expand the sites Node, you will see SharePoint Web Services
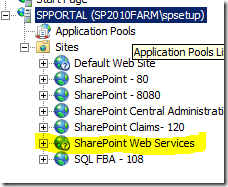
- Expand SharePoint Web Services, you can see SecurityTokenServiceApplication
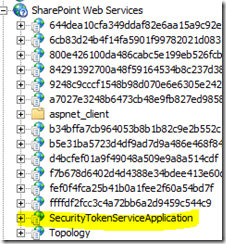
- Right click SecuritytokenServiceApplication and click explore, it will open the corresponding file system. By default, the path for STS is
C:\Program Files\Common Files\Microsoft Shared\Web Server Extensions\14\WebServices\SecurityToken
You need to modify the configuration file available in the mentioned location. - The web application that needs to be enabled with form authentication.
- You need to modify the configuration of your web application to make sure your web application identifies users from the form authentication.
Based on the above, I am going to modify the web configuration. At end of each step, I have mentioned the expected output. I recommend you to go step by step and after each step, make sure the configuration changes are working as expected. If you do everything all together, and test your application at the end, you may face difficulties in troubleshooting the configuration errors.
Modifications for Central Administration Web.Config
Open the web.config for the Central administration in a text editor. I always prefer Visual Studio, for editing web.config. In most cases, the path of the web.config for the central administration website is as follows
C:\inetpub\wwwroot\wss\VirtualDirectories\<port number>
Make sure you keep a backup copy of the web.config, before editing it.
Let me summarize what we are going to do with Central Administration web.config. First I am going to add a connection string that points to the form authentication database, that I created as mentioned in previous steps. Then I need to add a membership provider and a role manager with the corresponding connectionstring. Then I need to update the peoplepickerwildcards section to make sure the users are appearing in search results.
By default there is no connection string available in the web.config of Central Administration. Add a connection string just after the configsections element. The below is the connection string I have used all over the article.
<add name="FormAuthConnString" connectionString="Initial Catalog=yourdatabasename;data source=databaseservername;Integrated Security=SSPI;" />
Once you added the connection string, the web.config look similar to
Now add membership provider to the code. In web.config for CA, there will be <membership> tag, search for it. You will find membership and role manager under the <system.web> element. Under the membership providers section add the below code…
<add name="SPFormAuthMembership" type="System.Web.Security.SqlMembershipProvider, System.Web, Version=2.0.0.0, Culture=neutral, PublicKeyToken=b03f5f7f11d50a3a" applicationName="FormAuthApplication" connectionStringName="FormAuthConnString" />
After adding memberhip element, see the snapshot of the web.config.
Now you need to add role manager element to the web.config. Insider providers element under rolemanager, add the below code.
<add name="SPFormAuthRoleManager" type="System.Web.Security.SqlRoleProvider, System.Web, Version=2.0.0.0, Culture=neutral, PublicKeyToken=b03f5f7f11d50a3a" applicationName="FormAuthApplication" connectionStringName="FormAuthConnString" />
After adding, your role manager will look similar to the following.
As a last step, you need to update the people picker wildcard element in web.config, so that the users from your membership provider are available for browsing in Central Administration.
Search for PeoplePickerWildcards in the web.config, add the following inside the <PeoplePickerWildcards> tag.
<add key="SPFormAuthMembership" value="%" />
After adding this element, your web.config will look like
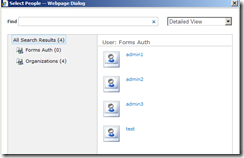
After completing these steps, you can browse the users available in the SQL server database from central administration website. Go to the site collection administrator’s page from central administration. Select the site collection you have created for form authentication. Click on the people picker icon![]() , choose Forms Auth and click on the search icon, you will see the users listed from the SQL server database.
, choose Forms Auth and click on the search icon, you will see the users listed from the SQL server database.
Once you complete these steps, make sure the users are available for browsing from central administration website. If you are unable to find the users, there must be some errors in the configuration, check windows event logs to find related errors and fix them.
Change the web.config for STS application
Open the web.config for STS application in text editor. By default, STS web.config does not have system.Web or connectionstrings section. Just after the System.Webserver element, add the following code.
<connectionStrings>
<add name="FormAuthConnString" connectionString="Initial Catalog=aspnetdb_claim;data source=sp2010_db;Integrated Security=SSPI;" />
</connectionStrings>
<system.web>
<roleManager enabled="true" cacheRolesInCookie="false" cookieName=".ASPXROLES" cookieTimeout="30" cookiePath="/" cookieRequireSSL="false" cookieSlidingExpiration="true" cookieProtection="All" createPersistentCookie="false" maxCachedResults="25">
<providers><add name="SPFormAuthRoleManager" type="System.Web.Security.SqlRoleProvider, System.Web, Version=2.0.0.0, Culture=neutral, PublicKeyToken=b03f5f7f11d50a3a" applicationName="FormAuthApplication" connectionStringName="FormAuthConnString" /> </providers>
</roleManager>
<membership userIsOnlineTimeWindow="15" hashAlgorithmType="">
<providers>
<add name="SPFormAuthMembership" type="System.Web.Security.SqlMembershipProvider, System.Web, Version=2.0.0.0, Culture=neutral, PublicKeyToken=b03f5f7f11d50a3a" applicationName="FormAuthApplication" connectionStringName="FormAuthConnString" />
</providers>
</membership>
</system.web>
See the snapshot of the web.config after adding the required elements.
After adding this, you should be able to login using the credentials from SQL server. Try assigning a user as primary/secondary administrator for your site collection from Central Administration and login to your site using form authentication. If you made everything correct, you should be able to login. This means you have successfully completed configuration of STS
Configuration of Web Application for Form Authentication
As a last step, you need to modify the web.config of the form authentication web application. Once you have done this, you should be able to grant permissions to users stored in the membership database.
Open the Web.config of the web application you created for form authentication. You can find the web.config for the application under the path
C:\inetpub\wwwroot\wss\VirtualDirectories\<port number>
Basically you need to add connection string, membership provider, role manager and update the people picker wild card configuration.
Add the connection string (same as the one you added to the web.config in Central Administration). See the screenshot after the connection string has added.
Search for <membership> in the web.config, you will find this inside system.web element. There will be other providers already available there. You add your form authentication membership provider (similar to the one added to Central Administration web.config) to the provider element under membership. Find the snapshot of membership configuration as follows.
Search for <roleManager> element in web.config, add the new provider name under providers section of the roleManager element. See the snapshot of web.config after new provider added.
Now you need to configure the peoplepickerwildcard configuration in web.config. As I specified earlier, this is to make sure, you can locate the users by entering a part of their username. Add the following line under the <PeoplePickerWildcards> element in web.config.
See the screenshot of the peoplePickerWildcards element after the element has been added.
Now you have completed all the setup for form authentication. Navigate to the web application.
From the site actions -> site settings -> go to peope and groups
Click on new -> add users, it will popup the people picker dialog.
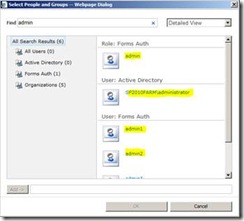
Click on the ![]() icon, select Form Auth, enter a username in the search textbox, and click on search icon. See the screenshot of admin search when I tried searching the users
icon, select Form Auth, enter a username in the search textbox, and click on search icon. See the screenshot of admin search when I tried searching the users
If it displays the user, it means you are done with the configuration. If you add users to the form authentication database, the users will be able to access SharePoint portal as normal.
© ASP.net Weblogs or respective owner
