Adventures in Windows 8: Solving activation errors
Posted
by Laurent Bugnion
on Geeks with Blogs
See other posts from Geeks with Blogs
or by Laurent Bugnion
Published on Mon, 10 Sep 2012 07:17:28 GMT
Indexed on
2012/09/10
9:38 UTC
Read the original article
Hit count: 316
Note: I tagged this article with “MVVM” because I got a few support requests for MVVM Light regarding this exact issue. In fact it is a Windows 8 issue and has nothing to do with MVVM Light per se…
Sometimes when you work on a Windows 8 app, you will get a very annoying issue when starting the app. In that case, the app doesn’t not even start past the Splash screen. Putting a breakpoint in App.xaml.cs doesn’t help because the app doesn’t even reach that point!
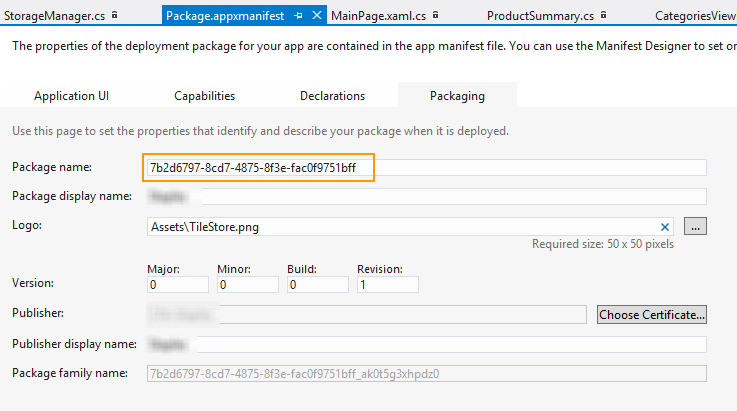
So what exactly is happening? Well when a Windows 8 app starts, the system is performing a few check first. One of the checks, for instance, is to see if an app with the same package ID is already available. The package ID is a unique value set in the package manifest.
- In the Solution Explorer, double click on Package.appxmanifest.
- This opens the manifest in a special editor
- Click on the Packaging tab
- See the GUID under Package Name. This is the unique ID I am talking about.

If there is a conflict (i.e. if an app is already installed with the exact same ID), Windows will warm the user that the app is already installed. However when you are in the process of developing an app, you install and uninstall the same app many many times (every time that you start in Visual Studio), and sometimes some issues arise, for instance failing to uninstall the app before starting the new instance of the same app.
First step if you get such an error
When the application fails to start past the splash screen, the first step is to identify what kind of error happened. In my experience the “already installed” is by far the most frequent (in fact I never had another such error), but it can be something else. An annoying thing is that the popup that shows the error is usually started below the Windows 8 app, and so you don’t even see it! This is especially true if you run this in the Simulator. In that case, do the following: Press on the Simulator’s home button, then press on the Desktop tile on the Start menu. The error popup should be shown on the desktop.
If your applications runs on the Local machine, you also do the same and press the Windows button, and then from the Start menu press the Desktop tile.
Deployment error in Studio
Sometimes the same error causes Visual Studio to fail launching the application at all with a deployment error. This is a better case, because at least it is clear that there is an issue. In that case, write down the code that is shown in the Error window (for instance 0x80073D05 in the example below).

Once you have the error code, go to the “Troubleshooting packaging, deployment, and query of Windows Store apps” page and look up the code in question.
In my case, the error was “ERROR_DELETING_EXISTING_APPLICATIONDATA_STORE_FAILED”, “An error occurred while deleting the package's previously existing application data.”
Solving the “ERROR_DELETING_EXISTING_APPLICATIONDATA_STORE_FAILED” issue
Update: Before trying the below, you can also try the simple steps:
- Exit Visual Studio
- Go to the Start menu
- Locate your app’s tile. It should be visible in the Start menu directly, towards the far end on the right.
- Right click the tile and select Uninstall from the App Bar.
- Restart Visual Studio and try again.
Sometimes it helps. If it doesn’t, then try the following:
In order to solve the case where Windows, for any reason, fails to delete the existing application before starting the new instance, follow the steps:
- Open the Package.appxmanifest in Visual Studio
- Open the Packaging tab.
- Change the Package name. For tests you can just try to change the last character of the GUID, though I would recommend creating a brand new GUID.
- Press Start
- Type GUID
- Start the GUID Generator application
- Select Registry Format
- Press Copy.
- Paste the new GUID in place of the Package Name in Visual Studio
- Important: don’t forget to remove the curly brackets at the beginning and at the end of the newly pasted GUID.
Then you just have to cross your fingers and start the application again… If it works, celebrate. if it doesn’t work… well at this point I am not sure so good luck with that ;)
Happy coding,
Laurent
© Geeks with Blogs or respective owner
