Announcing: Great Improvements to Windows Azure Web Sites
Posted
by ScottGu
on ASP.net Weblogs
See other posts from ASP.net Weblogs
or by ScottGu
Published on Mon, 17 Sep 2012 15:42:22 GMT
Indexed on
2012/09/17
21:40 UTC
Read the original article
Hit count: 458
I’m excited to announce some great improvements to the Windows Azure Web Sites capability we first introduced earlier this summer.
Today’s improvements include: a new low-cost shared mode scaling option, support for custom domains with shared and reserved mode web-sites using both CNAME and A-Records (the later enabling naked domains), continuous deployment support using both CodePlex and GitHub, and FastCGI extensibility. All of these improvements are now live in production and available to start using immediately.
New “Shared” Scaling Tier
Windows Azure allows you to deploy and host up to 10 web-sites in a free, shared/multi-tenant hosting environment. You can start out developing and testing web sites at no cost using this free shared mode, and it supports the ability to run web sites that serve up to 165MB/day of content (5GB/month). All of the capabilities we introduced in June with this free tier remain the same with today’s update.
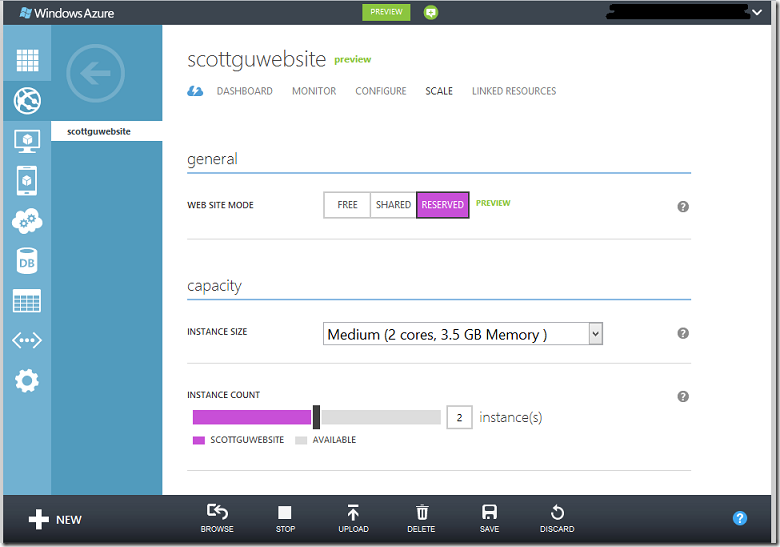
Starting with today’s release, you can now elastically scale up your web-site beyond this capability using a new low-cost “shared” option (which we are introducing today) as well as using a “reserved instance” option (which we’ve supported since June). Scaling to either of these modes is easy. Simply click on the “scale” tab of your web-site within the Windows Azure Portal, choose the scaling option you want to use with it, and then click the “save” button. Changes take only seconds to apply and do not require any code to be changed, nor the app to be redeployed:
Below are some more details on the new “shared” option, as well as the existing “reserved” option:
Shared Mode
With today’s release we are introducing a new low-cost “shared” scaling mode for Windows Azure Web Sites. A web-site running in shared mode is deployed in a shared/multi-tenant hosting environment. Unlike the free tier, though, a web-site in shared mode has no quotas/upper-limit around the amount of bandwidth it can serve. The first 5 GB/month of bandwidth you serve with a shared web-site is free, and then you pay the standard “pay as you go” Windows Azure outbound bandwidth rate for outbound bandwidth above 5 GB.
A web-site running in shared mode also now supports the ability to map multiple custom DNS domain names, using both CNAMEs and A-records, to it. The new A-record support we are introducing with today’s release provides the ability for you to support “naked domains” with your web-sites (e.g. http://microsoft.com in addition to http://www.microsoft.com). We will also in the future enable SNI based SSL as a built-in feature with shared mode web-sites (this functionality isn’t supported with today’s release – but will be coming later this year to both the shared and reserved tiers).
You pay for a shared mode web-site using the standard “pay as you go” model that we support with other features of Windows Azure (meaning no up-front costs, and you pay only for the hours that the feature is enabled). A web-site running in shared mode costs only 1.3 cents/hr during the preview (so on average $9.36/month).
Reserved Instance Mode
In addition to running sites in shared mode, we also support scaling them to run within a reserved instance mode. When running in reserved instance mode your sites are guaranteed to run isolated within your own Small, Medium or Large VM (meaning no other customers run within it). You can run any number of web-sites within a VM, and there are no quotas on CPU or memory limits.
You can run your sites using either a single reserved instance VM, or scale up to have multiple instances of them (e.g. 2 medium sized VMs, etc). Scaling up or down is easy – just select the “reserved” instance VM within the “scale” tab of the Windows Azure Portal, choose the VM size you want, the number of instances of it you want to run, and then click save. Changes take effect in seconds:
Unlike shared mode, there is no per-site cost when running in reserved mode. Instead you pay only for the reserved instance VMs you use – and you can run any number of web-sites you want within them at no extra cost (e.g. you could run a single site within a reserved instance VM or 100 web-sites within it for the same cost). Reserved instance VMs start at 8 cents/hr for a small reserved VM.
Elastic Scale-up/down
Windows Azure Web Sites allows you to scale-up or down your capacity within seconds. This allows you to deploy a site using the shared mode option to begin with, and then dynamically scale up to the reserved mode option only when you need to – without you having to change any code or redeploy your application.
If your site traffic starts to drop off, you can scale back down the number of reserved instances you are using, or scale down to the shared mode tier – all within seconds and without having to change code, redeploy, or adjust DNS mappings. You can also use the “Dashboard” view within the Windows Azure Portal to easily monitor your site’s load in real-time (it shows not only requests/sec and bandwidth but also stats like CPU and memory usage).
Because of Windows Azure’s “pay as you go” pricing model, you only pay for the compute capacity you use in a given hour. So if your site is running most of the month in shared mode (at 1.3 cents/hr), but there is a weekend when it gets really popular and you decide to scale it up into reserved mode to have it run in your own dedicated VM (at 8 cents/hr), you only have to pay the additional pennies/hr for the hours it is running in the reserved mode. There is no upfront cost you need to pay to enable this, and once you scale back down to shared mode you return to the 1.3 cents/hr rate. This makes it super flexible and cost effective.
Improved Custom Domain Support
Web sites running in either “shared” or “reserved” mode support the ability to associate custom host names to them (e.g. www.mysitename.com). You can associate multiple custom domains to each Windows Azure Web Site.
With today’s release we are introducing support for A-Records (a big ask by many users). With the A-Record support, you can now associate ‘naked’ domains to your Windows Azure Web Sites – meaning instead of having to use www.mysitename.com you can instead just have mysitename.com (with no sub-name prefix). Because you can map multiple domains to a single site, you can optionally enable both a www and naked domain for a site (and then use a URL rewrite rule/redirect to avoid SEO problems).
We’ve also enhanced the UI for managing custom domains within the Windows Azure Portal as part of today’s release. Clicking the “Manage Domains” button in the tray at the bottom of the portal now brings up custom UI that makes it easy to manage/configure them:
As part of this update we’ve also made it significantly smoother/easier to validate ownership of custom domains, and made it easier to switch existing sites/domains to Windows Azure Web Sites with no downtime.
Continuous Deployment Support with Git and CodePlex or GitHub
One of the more popular features we released earlier this summer was support for publishing web sites directly to Windows Azure using source control systems like TFS and Git. This provides a really powerful way to manage your application deployments using source control. It is really easy to enable this from a website’s dashboard page:
The TFS option we shipped earlier this summer provides a very rich continuous deployment solution that enables you to automate builds and run unit tests every time you check in your web-site, and then if they are successful automatically publish to Azure.
With today’s release we are expanding our Git support to also enable continuous deployment scenarios and integrate with projects hosted on CodePlex and GitHub. This support is enabled with all web-sites (including those using the “free” scaling mode).
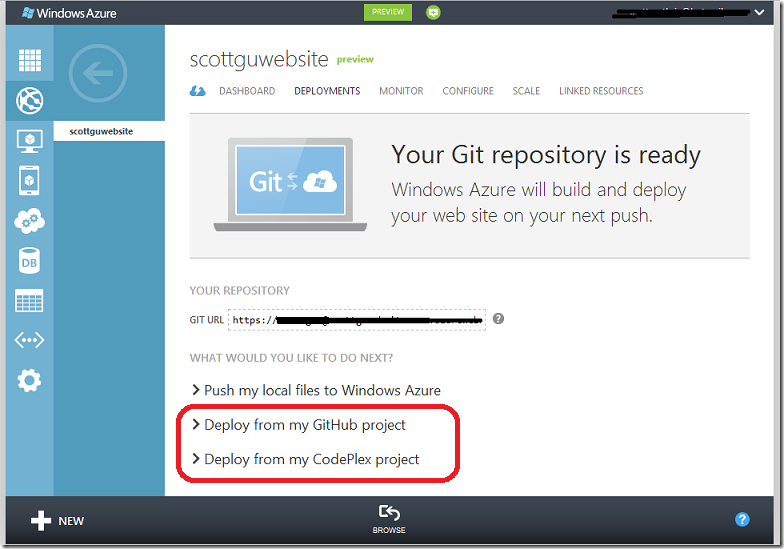
Starting today, when you choose the “Set up Git publishing” link on a website’s “Dashboard” page you’ll see two additional options show up when Git based publishing is enabled for the web-site:
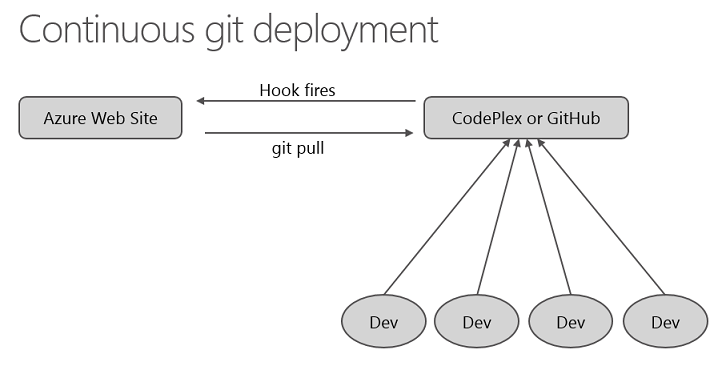
You can click on either the “Deploy from my CodePlex project” link or “Deploy from my GitHub project” link to walkthrough a simple workflow to configure a connection between your website and a source repository you host on CodePlex or GitHub. Once this connection is established, CodePlex or GitHub will automatically notify Windows Azure every time a checkin occurs. This will then cause Windows Azure to pull the source and compile/deploy the new version of your app automatically.
The below two videos walkthrough how easy this is to enable this workflow and deploy both an initial app and then make a change to it:
- Enabling Continuous Deployment with Windows Azure Websites and CodePlex (2 minutes)
- Enabling Continuous Deployment with Windows Azure Websites and GitHub (2 minutes)
This approach enables a really clean continuous deployment workflow, and makes it much easier to support a team development environment using Git:
Note: today’s release supports establishing connections with public GitHub/CodePlex repositories. Support for private repositories will be enabled in a few weeks.
Support for multiple branches
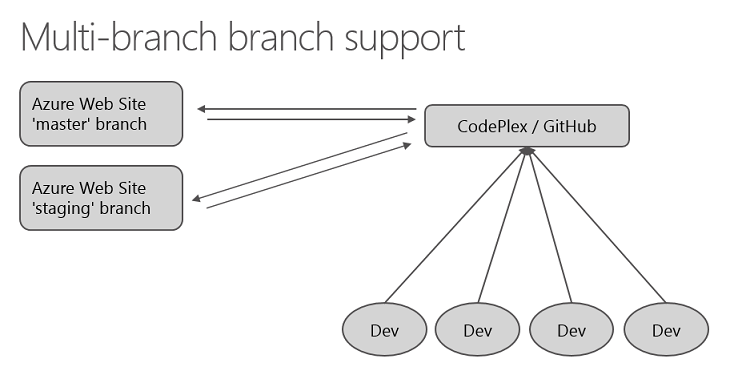
Previously, we only supported deploying from the git ‘master’ branch. Often, though, developers want to deploy from alternate branches (e.g. a staging or future branch). This is now a supported scenario – both with standalone git based projects, as well as ones linked to CodePlex or GitHub. This enables a variety of useful scenarios.
For example, you can now have two web-sites - a “live” and “staging” version – both linked to the same repository on CodePlex or GitHub. You can configure one of the web-sites to always pull whatever is in the master branch, and the other to pull what is in the staging branch. This enables a really clean way to enable final testing of your site before it goes live.
This 1 minute video demonstrates how to configure which branch to use with a web-site.
Summary
The above features are all now live in production and available to use immediately. If you don’t already have a Windows Azure account, you can sign-up for a free trial and start using them today. Visit the Windows Azure Developer Center to learn more about how to build apps with it.
We’ll have even more new features and enhancements coming in the weeks ahead – including support for the recent Windows Server 2012 and .NET 4.5 releases (we will enable new web and worker role images with Windows Server 2012 and .NET 4.5 next month). Keep an eye out on my blog for details as these new features become available.
Hope this helps,
Scott
P.S. In addition to blogging, I am also now using Twitter for quick updates and to share links. Follow me at: twitter.com/scottgu
© ASP.net Weblogs or respective owner


